Box Integration in iOS apps
Introduction
Cloud storage and other multiple features of cloud computing have made modern users familiar to cloud. Box and Dropbox have become so popular that users search for them in almost every app where they need to handle files.
Here we are going to discuss how to include BOX in your iOS application with ease using the Box SDK provided by them.
Register and getting required client ID for your application
- Register your name as Box Developer. Go to official developer page of BOX, and register your account. With the help of this account you can register the application you want to develop
- Register your application
- Login with your credentials and create an application in your account. As you create you get the option to configure your application. Otherwise just press the edit button to configure
- Getting OAuth2 parameters
- Under the OAuth2 parameters and section you will get your ‘client_id’ and ‘client_secret’
- Note them down as you are going to need them while setting up your application
Getting the Box SDK
In order to support the latest development, get the latest SDK from Box as the earlier one has been deprecated.
Add the Box SDK to your project as a dependent XCode project.
I am not repeating the ways for adding it as it is quite well described in the SDK project and is redundant in this blog. Follow the Readme section in the SDK and perform all the necessary changes. This will allow you to add the box SDK as a dependent Xcode project in your project.
N.B: Add -ObjC in Other Linker Flags .
Configuring your Box
Step 1: To set your client ID and client secret on the SDK client, open your Appdelgate.m and import the BoxSDK.h.
#import <BoxSDK/BoxSDK.h>
Step 2: In your Appdelegate.m , paste this 2 liner code inside ‘applicationDidFinishLaunchingWithOptions method.
[BoxSDK sharedSDK].OAuth2Session.clientID = @"your_Client_id";
[BoxSDK sharedSDK].OAuth2Session.clientSecret = @"your_Client_Secret_Key";
Step 3: Setting the custom URL. The easiest way to register for this scheme is to right click on your app’s PLIST file and select Open As -> Source Code. Then add the following code below the first tag. Change APP_KEY with your app’s APP_KEY. (Important: do NOT remove the boxsdk- in front of APP_KEY).
<key>CFBundleURLTypes</key>
<array>
    <dict>
        <key>CFBundleURLSchemes</key>
        <array>
            <string>boxsdk-APP_KEY</string>
        </array>
    </dict>
</array>
Step 4 : Go to target dependencies of your project and over there add BoxSDK.
Step 5 : In link binary with libraries, link your project with libBoxSDK.a.
Authenticate your app with Box
In order to do this you need to use Oauth2. The SDK provides a simple UIWebView to show the authorization flow. You can use the web-view provided using these simple lines of codes in your AppDelegate.m:
- (BOOL)application:(UIApplication *)application
            openURL:(NSURL *)url
  sourceApplication:(NSString*)sourceApplication
         annotation:(id)annotation
{
    [[BoxSDK sharedSDK].OAuth2Session performAuthorizationCodeGrantWithReceivedURL:url];
    return YES;
}
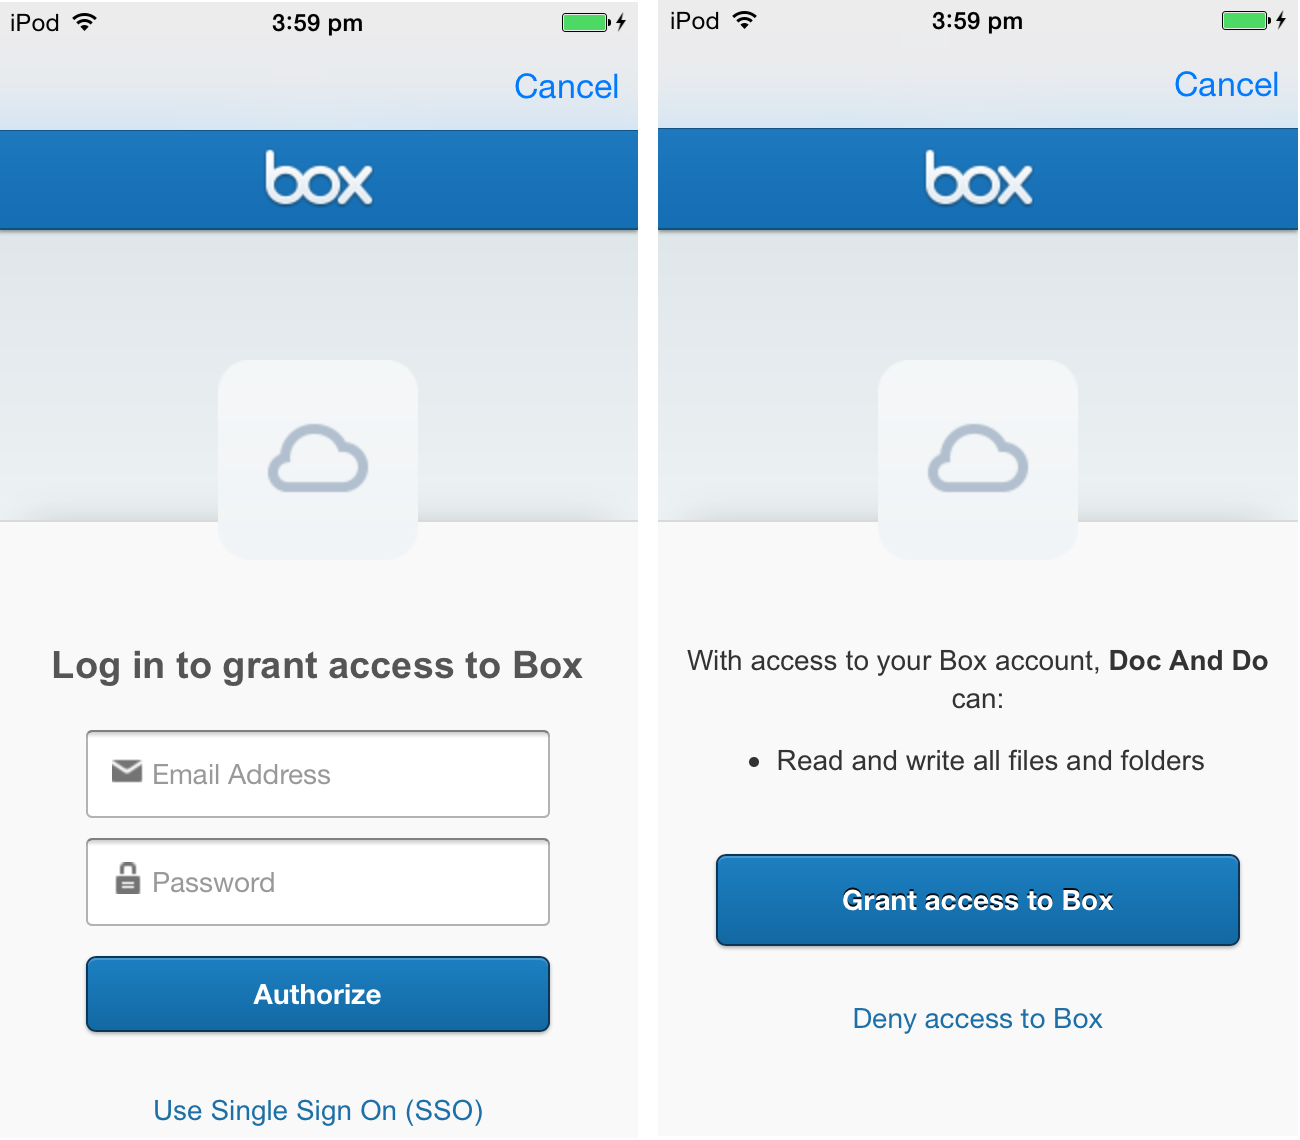
As soon as you run your app and fire up Box integration you will see the following screen on your device screen followed by another screen after entering the proper credentials.
API calls and Folder Picker
Now that you have authorized you can make API calls keeping in mind that all calls made are asynchronous. For more details please go through ‘Making Api Calls’.
However, I am not going into details in this tutorial. I will be showing you how to browse through the folders much more easily using folder picker. Now ‘Folder Picker’ is a widget that comes with the SDK. It has a simple interface and can be managed with ease with SDK taking care of the API calls necessary for it.
Please complete the necessary additional steps required to add Folder picker widget in your application. Again I am not repeating the steps as it would be redundant. However, if you face any problem in these steps or anywhere feel free to leave a comment here, I am at your help.
The easiest way to integrate the Folder picker is to first download this sample application using the Folder Picker.
Step 1: Create a button clicking on which the application would call Box.
Step 2: Create (IBAction) method for the button, in which write these codes:
NSString *redirectURI = [BoxSDK sharedSDK].OAuth2Session.redirectURIString;

BoxAuthorizationViewController *authorizationController = [[BoxAuthorizationViewController alloc]
                                                                   initWithAuthorizationURL:[[BoxSDK sharedSDK].OAuth2Session authorizeURL] redirectURI:redirectURI];

BoxAuthorizationNavigationController *loginNavigation = [[BoxAuthorizationNavigationController alloc] initWithRootViewController:authorizationController];

authorizationController.delegate = loginNavigation;

loginNavigation.modalPresentationStyle = UIModalPresentationFormSheet;

[self presentViewController:loginNavigation animated:YES completion:nil];
N.B: Do not get confused with the errors. We will include some files in later steps that will solve all errors.
Step 3: Add these two functions after this, which gets called on notification fired for authorization.
- (void)boxAPIAuthenticationDidSucceed:(NSNotification *)notification
{
    NSLog(@"Received OAuth2 successfully authenticated notification");
    BoxOAuth2Session *session = (BoxOAuth2Session *) [notification object];
    NSLog(@"Access token  (%@) expires at %@", session.accessToken, session.accessTokenExpiration);
    NSLog(@"Refresh token (%@)", session.refreshToken);

    [[NSUserDefaults standardUserDefaults]setBool:YES forKey:@"isAuthorized"];

    dispatch_sync(dispatch_get_main_queue(), ^{
        [self dismissViewControllerAnimated:YES completion:^{
            [self accessBoxForFiles];
        }];
    });
}

- (void)boxAPIAuthenticationDidFail:(NSNotification *)notification
{
    NSLog(@"Received OAuth2 failed authenticated notification");
    NSString *oauth2Error = [[notification userInfo] valueForKey:BoxOAuth2AuthenticationErrorKey];
    NSLog(@"Authentication error  (%@)", oauth2Error);

    [[NSUserDefaults standardUserDefaults]setBool:NO forKey:@"isAuthorized"];

    dispatch_sync(dispatch_get_main_queue(), ^{
        [self dismissViewControllerAnimated:YES completion:nil];
    });
}
Step 4: Add following two lines in viewDidLoad of the same viewController.m file. This is done to fire notification on authorization.
 [[NSNotificationCenter defaultCenter] addObserver:self
                                             selector:@selector(boxAPIAuthenticationDidSucceed:)
                                                 name:BoxOAuth2SessionDidBecomeAuthenticatedNotification
                                               object:[BoxSDK sharedSDK].OAuth2Session];

    [[NSNotificationCenter defaultCenter] addObserver:self
                                             selector:@selector(boxAPIAuthenticationDidFail:)
                                                 name:BoxOAuth2SessionDidReceiveAuthenticationErrorNotification
                                               object:[BoxSDK sharedSDK].OAuth2Session];
Step 5: Open Storyboard and create a UITableViewController and embed it in Navigation controller. Now set the Storyboard ID of the Navigation Controller as ‘FolderTableView’ and then set the Storyboard ID of the UITableViewController as ‘FolderBox’.
Step 6: Now add the method to access the files using the Folder Picker widget.
-(void)accessBoxForFiles
{
    UIStoryboard *settingsStoryBoard = [UIStoryboard storyboardWithName:@"Settings" bundle:nil];
    UIViewController *initialViewController  = [settingsStoryBoard instantiateViewControllerWithIdentifier:@"FolderTableView"];


    initialViewController.modalTransitionStyle = UIModalTransitionStyleCoverVertical;
    [self presentViewController:initialViewController animated:YES completion:nil];
}
Step 7: Now open the sample application project you downloaded. Drag the following files in your project and check Copy files if needed. You are going to re-use the files in your project.
a. BoxAuthorizationNavigationController.h
b. BoxAuthorizationNavigationController.m
c. BoxFolderViewController.h
d. BoxFolderViewController.m
e. BoxTrashFolderViewController.h
f. BoxTrashFolderViewController.m
g. BoxPreviewViewController.h
h. BoxPreviewViewController.m
i. KeychainItemWrapper.h
j. KeychainItemWrapper.m
Step 8: Open BoxFolderViewController.m in your project. You will have to edit slightly over here. Navigate to the ‘folderViewFromStoryboardWithFolderID’ method and first check your storyboard name. Then replace FolderTableView with FolderBox. So finally the function would look somewhat like this :
+ (instancetype)folderViewFromStoryboardWithFolderID:(NSString *)folderID folderName:(NSString *)folderName;
{

    NSString *storyboardName = @"MainStoryboard_iPhone"; //your StoryBoard name
    if (IS_IPAD())
    {
        storyboardName = @"MainStoryboard_iPad";
    }

    BoxFolderViewController *folderViewController = (BoxFolderViewController*)[[UIStoryboard storyboardWithName:storyboardName bundle:nil] instantiateViewControllerWithIdentifier:@"FolderBox"];

    folderViewController.folderID = folderID;
    folderViewController.folderName = folderName;

    return folderViewController;
}
Now all main methods are written. A few more things to do now.
1. Set the custom class for the UITableViewController as ‘BoxFolderViewController’.
2. Set the reuse-identifier of the UITableViewController’s tableViewCell.
3. Import the following header files :
#import "BoxAuthorizationNavigationController.h"
#import <BoxSDK/BoxSDK.h>
4. Update the KeychainItemWrapper.h class with the one I have uploaded in the Demo project.
5. Comment out //#import “BoxNavigationController.h” in BoxFolderViewController and its counterparts.
Now your project is ready. Run the project.
Archiving and building IPA
While archiving the project, you may face some difficulties if you already have Dropbox added to your project. However, to make it more generic, here are some modifications:
- Go to your project and Open Build Settings > Architecture.
- Now select other and add $(ARCHS_STANDARD_INCLUDING_64_BIT).
- Set Build Active Architecture Only to Yes for both debug and release.
- In Valid Architecture check if all three are present namely: arm64, armv7, armv7s. Select the Box project you have added below your project as a dependent project.
- And perform the same changes (steps 1-3). Go to Deployment > Skip Install and set it to Yes for Box project. This will make it sure that only your project is going to get installed.
You can download the sample project from GitHub.
Where to go from here
Now you have integrated Box in your project. Make the necessary views and modification in the folder picker to suit it according to your project design. There are some other cloud services offering storage and they are quite popular too. Read Integration of Dropbox in iOS applications and GoogleDrive Integration in iOS apps .