Core Data implementation in iOS
Core Data plays an essential role when it comes to storing relevant and significant data inside the app. Using core data doesn’t affect the application performance or responsiveness and rather reduces the memory overhead of your app as compared to other data storage methods. This blog introduces core data in a very short, compact and useful manner for those who want to grasp the basics of it in a very short time.
Core Data Key Concepts
1. NSManagedObject : NSManagedObject is a core data class that is associated with the core data Entity. It represents entity in the form of a description, NSEntityDescription, that provides metadata of a whole entity object(name, attributes, relationship).
2. NSPersistentStoreCoordinator : It is used by NSManagedObjectContext to save Core data Model objects to persistent store and then later retrieve the saved information.
3. NSManagedObjectContext : It’s an object space in an application where collection of core data models are managed. All the operation such as adding, deleting, searching etc are done with the help of NSManagedObjectContext and hence is of much use.
4. NSPredicate : NSPredicate is used to define constraints for data search or in-memory filtration. The constraints are the logic you acquire for finding a particular data or a set of data from the whole collection. Setting the NSPredicate to nil will set a constraint for fetching all the data from collection.
5. NSFetchRequest : NSFetchRequest is used to retrieve information from the collection based upon the constraints that you’ve defined for search or filter.
These key concepts are an essential part for constructing a core data collection inside the app. However, you get to use only a few while implementing it. The rest are just for the purpose of increasing sheer knowledge.
Implementing Core Data
Today we are going to implement a project where we will track the user and save the location obtained per day, within core data.
To start off create a new project in Xcode. While creating the project choose the option “Use Core Data”.

Once your project is created in the Project Navigator, you will see a core data file named “YourProject.xcdatamodeld”. If you want to add core data to an existing project, follow this tutorial.
Now, run your project and you will see a blank screen. There is nothing to be alarmed as you’ll get the whole process step by step. Make sure that you follow each and every step thoroughly.
Now when you will click on the the core data file, you will see an empty editor screen open up.
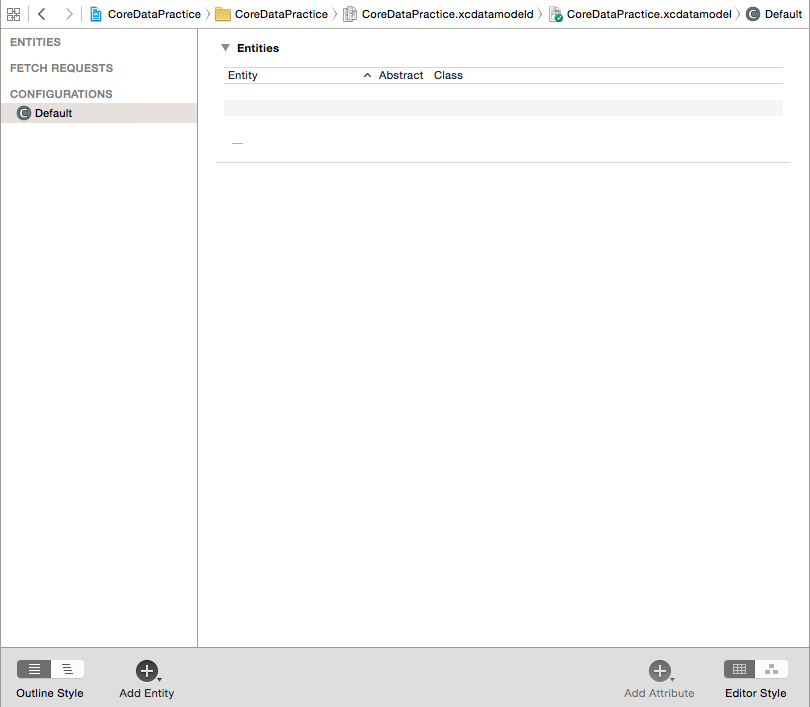
It is this editor where we will create our core data models.
Now click on the “Add Entity” button present on the bottom left corner next to “Outline Style” option. You will see that an Entity is created.
Now before we proceed, let’s finalize the entities that we are going to use. Our goal is to save user location as per the date.
So, we can say that there are two important datas to be saved, “Location” and “Date”. So let these two be the entities of the core data that we will use. Now add these two entities. After the addition, your core data editor should look somewhat like this.
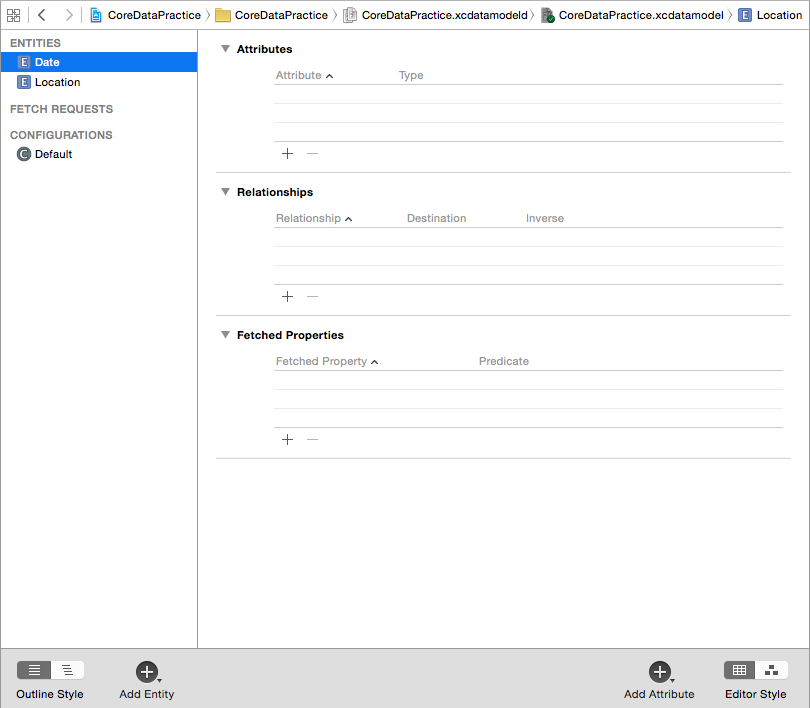
After the entities are created we will need to figure out the attributes of the two entities.
For the Date entity only a single attribute will be required i.e.date.
For the Location entity, two attributes will be required as location has two parts, latitude and longitude.
Add these attributes to the entities by clicking on the “+” button in attributes section . While adding attributes you will also have to set the “type” for attributes.
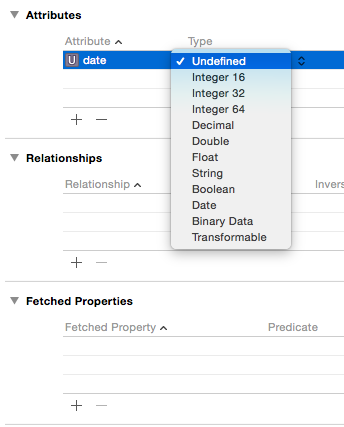
For date attribute in Date, the type will be “Date” and for latitude and longitude attribute in Location, I chose “String” type(according to my convenience). You can also choose the latitude and longitude of type float or double, according to your requirement and convenience.
After setting the attribute, it’s time to get into a deeper concept, Relationship.
Relationships
Relationships come into role when core data objects are related to each other. In this case, location and date are dependent when considering that, on a single day user can have multiple location data.
Relationship are of two types :
- one-to-one : In a one-to-one relationship, a single data of a certain model is in relationship with single data of another model.
- one-to-many : In a one-to-many relationship, multiple data of a model can be associated with single data of another model.
In our case, we will be using one-to-many relationship for Date-Location relation and on-to-one relationship for Location-Date relation, in our core data collection.
Relation Implementation
In the editor section of core data, go ahead on adding the relationship by clicking on “+” button in Relationship section after choosing the Date entity.
Name the relationship as “dateForLocation” and choose the destination to be ‘Location’. Now click on Data Model inspector and you will see a whole lot of options as shown in the image, below.
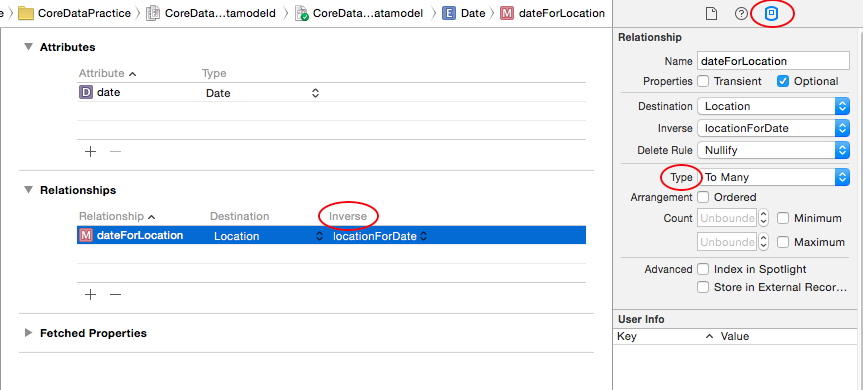
From the options go to the type option and select “To Many” option as one date can have multiple location.
Now in the same way create a relationship as “locationForDate” for ‘Location’ and choose the destination to be ‘Date’. Go to the data model inspector and choose the relationship type to be “To One” as one location will have only one date.
In the inverse option for ‘Location’ select the inverse to be ‘dateForLocation’ and for ‘Date’ entity select the inverse ‘locationForDate’.
Now we have completed our Core Data modelling.
Now Build your project for any errors. Hopefully you will find no errors. In case you find any, please go through the whole process again or ask me in the comments section below the article.
Creating Core Data Model Class
Go to Editor Option on the top bar and from there select “Create NSManagedObject Subclass..” option.

As soon as you click on NSManaged Subclass option, you will be prompted to select the entity for which you will you want to create the subclass. There select both the entities Date and Location.
After you finish creating the subclass you can see Date.h, Date.m, Location.h and Location.m created, but outside the project in project navigator. As a result of it, Date.m and Location.m will not be listed under the Compile Sources section in Build Phases, which will generate errors in project. To get rid of the errors, select the files and delete them by using the option “Remove Reference”. After that add those files back, inside the project.
After that go to the Build Phases -> Compile Sources and you will see Date.m and Location.m present there.
Now, Build your project to check for errors.
It’s time for some coding
- Setup for location tracking:
- Go to this GitHub Project and download it.
- Open the project and add the two files “LocationManager.h” and “LocationManager.m” to your project.
- Go to Info.plist and add keys NSLocationAlwaysUsageDescription and NSLocationWhenInUseUsageDescription. Against both the keys add the following line : “Your project wants to use your present location”.
- Go to AppDelegate.m and in the method (BOOL)application:(UIApplication *)application didFinishLaunchingWithOptions:(NSDictionary *)launchOptions add the following line :
[[LocationManager sharedManager] startUpdatingLocation];
- Now go to storyboard and in the View Controller add a mapkit view and a button “Show saved data”, as shown below :

- Create a property “mapview” by drag and drop for mapkit view in your ViewController.h
- Assign ViewController.h with mapview delegate MKMapViewDelegate.
- Go to ViewController.m and in (void)viewDidLoad method add the following lines.
_mapview.mapType = MKMapTypeStandard;
_mapview.delegate=self;
- Run your project and you will see a map in the simulator. Click on the simulator, then go to option Debug->Location and from there select “Freeway Drive”. This will create a simulation for user driving scenario. But, the map will stand still.
- After that you need to get Location details in ViewContoller.m. For that go to Build Phases->Link Binary With Library and add CoreLocation.framework. After that in your ViewController.m add #import <CoreLocation/CoreLocation.h>
- In – (void)viewDidLoad method add the following lines to register for location change notification
[[NSNotificationCenter defaultCenter] addObserver:self selector:@selector(getnewUserLocation:) name:@"kLocationChangeNotification" object:nil];
- Add the following function in order to listen for location tracking changes and update the map
-(void)getnewUserLocation:(NSNotification *)notification{

    //getting the new location through notification
    CLLocation *newLocation = [notification.userInfo objectForKey:@"location"];

    //setting map view coordinates for user
    MKCoordinateSpan span;
    span.latitudeDelta = .001;
    span.longitudeDelta = .001;
    MKCoordinateRegion region;
    region.center = newLocation.coordinate;
    region.span = span;
    [_mapview setUserTrackingMode:MKUserTrackingModeFollowWithHeading animated:YES];
 }
After that run your project and you will be able to see the map following, as user location will change. You will also get a new location of user, every time as ‘newLocation’.
Saving the Location in Core Data
Add the following lines of code in function -(void)getnewUserLocation:(NSNotification *)notification
[self saveLocationToCoreData:newLocation];
As soon as you add the above line you will get errors but don’t worry. Just create the required function in ViewController.m
-(void)saveLocationToCoreData:(CLLocation *)location{
}
After that lets add some core data element to save location and date in core data.
Let’s go step wise:
- Get the NSManagedObjectContext instance through AppDelegate instance.
AppDelegate *appDelegate=(AppDelegate*)[UIApplication sharedApplication].delegate;
NSManagedObjectContext *context=[appDelegate managedObjectContext];
- Create entity description for both Location and Date
//creating entities for location and date NSEntityDescription *entityForDate=[NSEntityDescription entityForName:@"Date" inManagedObjectContext:context]; NSEntityDescription *entityForLocation=[NSEntityDescription entityForName:@"Location" inManagedObjectContext:context]; - Initializing core data classes with entities formed
Date *dateToUpdate =[[Date alloc]initWithEntity:entityForDate insertIntoManagedObjectContext:context];
Location *locationToUpdate =[[Location alloc]initWithEntity:entityForLocation insertIntoManagedObjectContext:context];
- Assigning location value to core data objects
locationToUpdate.latitude = [NSString stringWithFormat:@"%f",location.coordinate.latitude];
locationToUpdate.longitude = [NSString stringWithFormat:@"%f",location.coordinate.longitude ];
- Creating date and location to be saved in core data
[dateToUpdate setValue:[NSDate date] forKey:@"date"]; [locationToUpdate setValue:locationToUpdate.latitude forKey:@"latitude"]; [locationToUpdate setValue:locationToUpdate.longitude forKey:@"longitude"]; - Updating the date object with location and saving the data
dateToUpdate.dateForLocation=[NSSet setWithObjects:locationToUpdate, nil];

NSError *error;
[context save:&error];
And here your data will start being saved. Run your project and check for errors. Now you might want to know if the data is actually being saved.
You can confirm that by fetching the data from where it is being saved.
Fetching data
For fetching location data perform the following steps in the desired function:
- Get the NSManagedObjectContext instance through AppDelegate instance.
AppDelegate *appDelegate=(AppDelegate*)[UIApplication sharedApplication].delegate;
NSManagedObjectContext *context=[appDelegate managedObjectContext];
- Creating entities for date
NSEntityDescription *entityForDate=[NSEntityDescription entityForName:@"Date" inManagedObjectContext:context];
- Initializing a fetch request for the entity
NSFetchRequest *request=[[NSFetchRequest alloc]init];
[request setEntity:entityForDate];
- Setting the search constraints through predicate
NSPredicate *predicate=nil; //will load all the statements from core data list
[request setPredicate:predicate];
- Getting the whole data in an array
NSError *error;
NSArray *dateArray=[context executeFetchRequest:request error:&error];
Printing the array will show all data retrieved. After that you can use them as you desire. You can find a sample project of the above tutorial on GitHub.
Hope I’ve helped in making this topic easier for you. If you find any difficulty or have any suggestions please feel free to comment below.