Creating Old Style Message Bubble With Swift
In present times chat applications have achieved the most popular category of apps, being installed by most smartphone users. Consequently, it has also marked the end of the SMS era. People have developed the habit of typing on highly popular Chat Applications like WhatsApp, WeChat, Line, Viber, Messenger, iMessage and send a quick message. Most of these apps also let you send pictures, video and voice clips along with regular text messages.
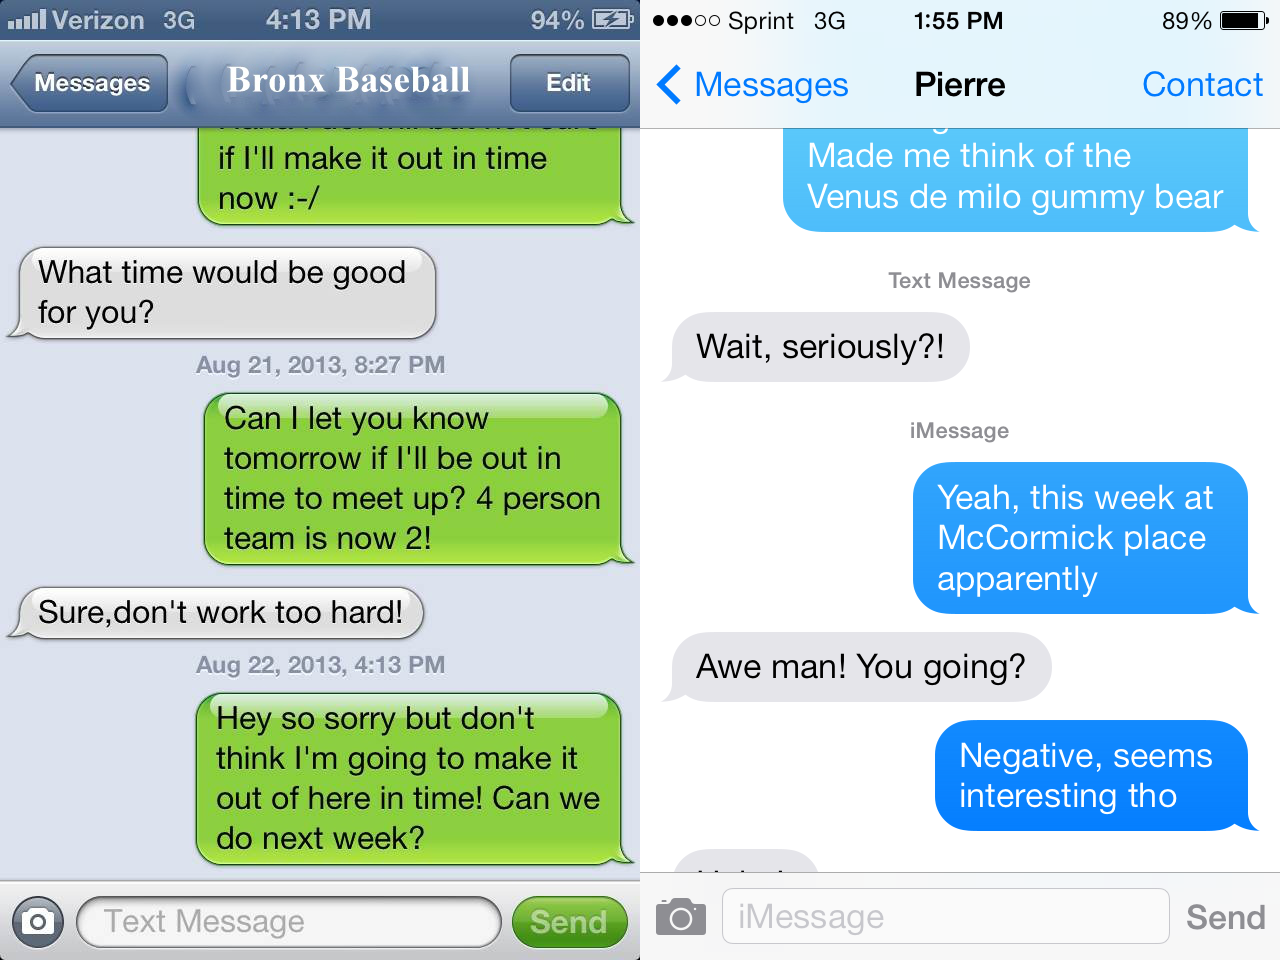
With the release of Apples iOS-7, the Message bubbles on the iMessage chat application got a complete makeover. The following two screenshots show the difference between the user interfaces of iMessage on iOS 6 and iOS 7 (or later).
Anyway, we are not going to start the discussion for determining the best out of the two. Our article is going to look into creating iOS 6 style message bubbles with Swift. In this blog, we will be implementing a custom chat bubble which will look something like below.
The Problem:
Creating the UILabel with numberOfLines = 0 is the best way to draw multiline labels as shown on the glossy bubbles. But the main problem is to draw the bubble. What happens if the message is as small as “Ok” or as long as an essay? Maintaining the bubble style with variable length of message text is the major cause of concern.
The Solution:
What we need is to create resizable image from a single template image.
For creating stretchable image, iOS 2 introduced an API on UIImage called
stretchableImageWithLeftCapWidth(_ leftCapWidth: Int, topCapHeight topCapHeight: Int) -> UIImage.
But this API was deprecated in iOS 5 but it is still available for development. To know more about this API head over to StackOverflow. iOS 5 introduced a new API for handling such scenario
resizableImageWithCapInsets(_ capInsets: UIEdgeInsets) -> UIImage
Now, we will concentrate on making stretchable images as background image of our chat bubble, using this latest API on UIImage.
How does it work?
Let’s have a close look on the following drawing
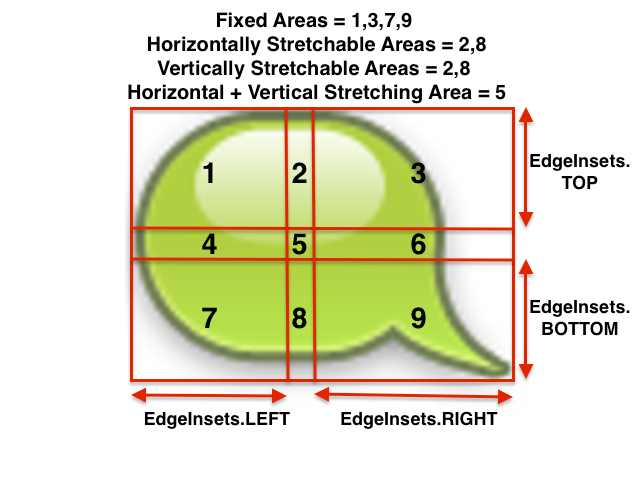
While creating a large UIImage from a smaller one, the original image is divided into 9 different portions as shown in the above picture. The division is based on the provided EdgeInsets while using the resizableImageWithCapInsets(_ capInsets: UIEdgeInsets) -> UIImage API. Then the API does the following tasks to draw the larger image:
- Division areas 1, 3, 7, 9 are kept intact with the 4 corners of the target image to maintain the shape of the image.
- Division 2 and 8 are horizontally stretched to fill in the gap between the two top and bottom corners, respectively.
- Similarly division 4 and 6 are vertically stretched to fill in the gap between the two left and right corners, respectively.
- Division 5, in the middle, is both horizontally and vertically stretched to fill up the centre portion of the large image.
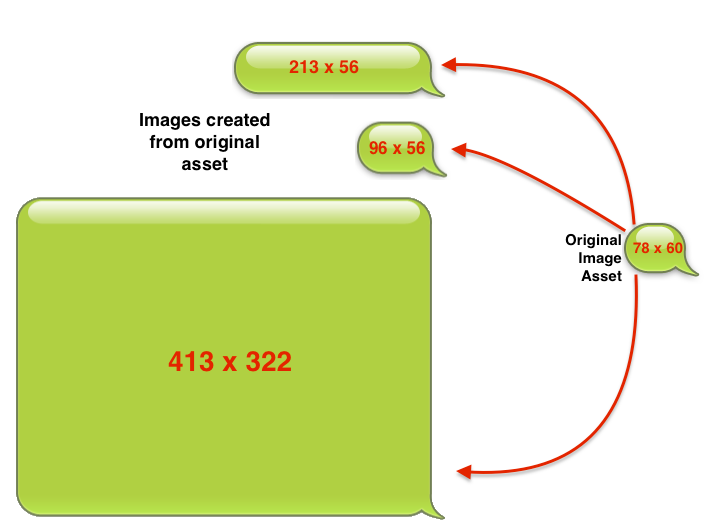
While creating the original image asset which is used to produce stretchable images we need to keep in mind the following things:
- The image should have high dpi.
- To minimize the size of the asset image we can keep the middle area as small as possible i.e. 1×1 Pixel.
Let’s Start Coding:
First download the configured project from GitHub. It comes with all image assets along with with a Util.swift class for handling the device detection and screen size calculations. Next, Open the Xcode project.
The Data Model:
Now we are going to create the data model to be shown in a single chat bubble, on screen. So what are the properties that we are going to consider? Our chat bubble can have a picture, some text and time of sending or receiving.
So it may contain
- An Image
- A Message Text
- Date
Anything else we are missing? What about introducing a type for a message bubble? It will be of type Mine if message is outgoing and Opponent if it is an incoming one. So the final contents are as follows
- An Image (Optional)
- A Message Text (Optional)
- Date
- Type (Incoming or outgoing)
Now create a new folder named DataModel in ChatBubbleScratch folder and add in ChatBubbleScratch group in file navigator. Create a new swift file named ChatBubbleData.swift in the specified group. Paste the following code at the very end of the file.
import UIKit // For using UIImage

// 1. Type Enum
/**
Enum specifing the type

- Mine:     Chat message is outgoing
- Opponent: Chat message is incoming
*/
enum BubbleDataType: Int{
    case Mine = 0
    case Opponent
}

/// DataModel for maintaining the message data for a single chat bubble
class ChatBubbleData {

    // 2.Properties
    var text: String?
    var image: UIImage?
    var date: NSDate?
    var type: BubbleDataType

    // 3. Initialization
    init(text: String?,image: UIImage?,date: NSDate? , type:BubbleDataType = .Mine) {
        // Default type is Mine
        self.text = text
        self.image = image
        self.date = date
        self.type = type
    }
}
The Bubble:
In a similar fashion create a new folder named Custom View inside the ChatBubbleScratch folder and add it in file navigator as a group. In this group create a new CocoaTouch Swift class named ChatBubble.swift keeping it Subclass of UIView. Now paste the following code in the class definition
// Properties
    var imageViewChat: UIImageView?
    var imageViewBG: UIImageView?
    var text: String?
    var labelChatText: UILabel?

    /**
    Initializes a chat bubble view

    :param: data   ChatBubble Data
    :param: startY origin.y of the chat bubble frame in parent view

    :returns: Chat Bubble
    */
    init(data: ChatBubbleData, startY: CGFloat){

        // 1. Initializing parent view with calculated frame
        super.init(frame: ChatBubble.framePrimary(data.type, startY:startY))

        // Making Background color as gray color
        self.backgroundColor = UIColor.lightGrayColor()

        let padding: CGFloat = 10.0

        // 2. Drawing image if any
        if let chatImage = data.image {

            let width: CGFloat = min(chatImage.size.width, CGRectGetWidth(self.frame) - 2 * padding)
            let height: CGFloat = chatImage.size.height * (width / chatImage.size.width)
            imageViewChat = UIImageView(frame: CGRectMake(padding, padding, width, height))
            imageViewChat?.image = chatImage
            imageViewChat?.layer.cornerRadius = 5.0
            imageViewChat?.layer.masksToBounds = true
            self.addSubview(imageViewChat!)
        }

        // 3. Going to add Text if any
        if let chatText = data.text {
            // frame calculation
            var startX = padding
            var startY:CGFloat = 5.0
            if let imageView = imageViewChat {
                startY += CGRectGetMaxY(imageViewChat!.frame)
            }
            labelChatText = UILabel(frame: CGRectMake(startX, startY, CGRectGetWidth(self.frame) - 2 * startX , 5))
            labelChatText?.textAlignment = data.type == .Mine ? .Right : .Left
            labelChatText?.font = UIFont.systemFontOfSize(14)
            labelChatText?.numberOfLines = 0 // Making it multiline
            labelChatText?.text = data.text
            labelChatText?.sizeToFit() // Getting fullsize of it
            self.addSubview(labelChatText!)
        }
        // 4. Calculation of new width and height of the chat bubble view
        var viewHeight: CGFloat = 0.0
        var viewWidth: CGFloat = 0.0
        if let imageView = imageViewChat {
            // Height calculation of the parent view depending upon the image view and text label
            viewWidth = max(CGRectGetMaxX(imageViewChat!.frame), CGRectGetMaxX(labelChatText!.frame)) + padding
            viewHeight = max(CGRectGetMaxY(imageViewChat!.frame), CGRectGetMaxY(labelChatText!.frame)) + padding

        } else {
            viewHeight = CGRectGetMaxY(labelChatText!.frame) + padding/2
            viewWidth = CGRectGetWidth(labelChatText!.frame) + CGRectGetMinX(labelChatText!.frame) + padding
        }

        // 5. Adding new width and height of the chat bubble frame
        self.frame = CGRectMake(CGRectGetMinX(self.frame), CGRectGetMinY(self.frame), viewWidth, viewHeight)
    }

    // 6. View persistance support
    required init(coder aDecoder: NSCoder) {
        fatalError("init(coder:) has not been implemented")
    }

    //MARK: - FRAME CALCULATION
    class func framePrimary(type:BubbleDataType, startY: CGFloat) -> CGRect{
        let paddingFactor: CGFloat = 0.02
        let sidePadding = ScreenSize.SCREEN_WIDTH * paddingFactor
        let maxWidth = ScreenSize.SCREEN_WIDTH * 0.65 // We are cosidering 65% of the screen width as the Maximum with of a single bubble
        let startX: CGFloat = type == .Mine ? ScreenSize.SCREEN_WIDTH * (CGFloat(1.0) - paddingFactor) - maxWidth : sidePadding
        return CGRectMake(startX, startY, maxWidth, 5) // 5 is the primary height before drawing starts
    }
So what we are doing here?
We are taking the chat bubble data and taking the origin.startY of the bubble frame in initialization method init(data:startY). Let’s try to understand it one by one
// 1. Class method framePrimary(_:startY) primarily calculates the frame for the bubble, depending upon the screen size of the device.
// 2. After basic resizing (If image size is larger than the view frame size), it draws the image on chat bubble.
// 3. This portion of code draws the message text if any.
// 4 & 5. As chat text label height is not known till we call sizeToFit() on label, we need to calculate proper values of width and height for that bubble with frame size of chatImage and labelChatText. Width and height of the chatBubble frame are then assigned to the proper value.
Let’s see what we have done so far:
Now paste the following code in viewDidLoad() function of ViewController.swift
        // Adding an out going chat bubble
        var chatBubbleDataMine = ChatBubbleData(text: "Hey there!!! How are you?", image: nil, date: NSDate(), type: .Mine)
        var chatBubbleMine = ChatBubble(data: chatBubbleDataMine, startY: 50)
        self.view.addSubview(chatBubbleMine)

        // Adding an incoming chat bubble
        var chatBubbleDataOpponent = ChatBubbleData(text: "Fine bro!!! check this out", image:UIImage(named: "chatImage3.jpg"), date: NSDate(), type: .Opponent)
        var chatBubbleOpponent = ChatBubble(data: chatBubbleDataOpponent, startY: CGRectGetMaxY(chatBubbleMine.frame) + 10)
        self.view.addSubview(chatBubbleOpponent)
Run your project using ⌘ + R. What do you see? It should look similar to the following
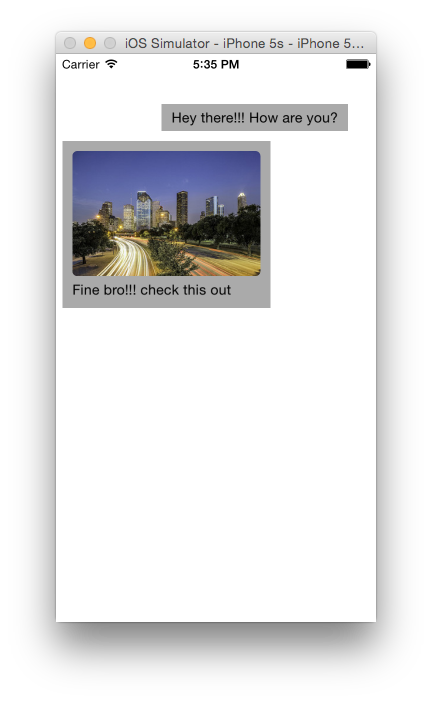
If you are facing any problem, make sure that you have followed each step properly upto this point. If problem persists take a fresh start by downloading the scratch project from GitHub.
Wait, where is our bubble?
“These don’t look like bubbles. Why are they in simple view??”. Don’t worry, just keep reading.
Adding the resizable bubble image :
Paste the following line of code at the very end of init(data:startY) function of ChatBubble.swift for creating bubble like structure.
        // 6. Adding the resizable image view to give it bubble like shape
        let bubbleImageFileName = data.type == .Mine ? "bubbleMine" : "bubbleSomeone"
        imageViewBG = UIImageView(frame: CGRectMake(0.0, 0.0, CGRectGetWidth(self.frame), CGRectGetHeight(self.frame)))
        if data.type == .Mine {
            imageViewBG?.image = UIImage(named: bubbleImageFileName)?.resizableImageWithCapInsets(UIEdgeInsetsMake(14, 14, 17, 28))
        } else {
            imageViewBG?.image = UIImage(named: bubbleImageFileName)?.resizableImageWithCapInsets(UIEdgeInsetsMake(14, 22, 17, 20))
        }
        self.addSubview(imageViewBG!)
        self.sendSubviewToBack(imageViewBG!)
Now, let’s select the file name of bubble image from type bubble data. An image view is created, taking the full width and height of the frame.
Have a closer look at the following lines
           imageViewBG?.image = UIImage(named: bubbleImageFileName)?.resizableImageWithCapInsets(UIEdgeInsetsMake(14, 14, 17, 28))  and
            imageViewBG?.image = UIImage(named: bubbleImageFileName)?.resizableImageWithCapInsets(UIEdgeInsetsMake(14, 22, 17, 20))
These edge insets should be given very precisely. You need to visually inspect and manually calculate these values while adding the image to image view.
Remember the following function signature. Yours would be something similar too.
func UIEdgeInsetsMake(top: CGFloat, left: CGFloat, bottom: CGFloat, right: CGFloat) -> UIEdgeInsets.
Run your project again using ⌘ + R. Your screen should look like the following

Great! The Bubble has finally appeared, but it does not look great as the imageViewChat
and labelChatText are not properly positioned with the bubble. Let’s try to position it properly.
Append the following code to position bubble image
  // Frame recalculation for filling up the bubble with background bubble image
        var repsotionXFactor:CGFloat = data.type == .Mine ? 0.0 : -8.0
        var bgImageNewX = CGRectGetMinX(imageViewBG!.frame) + repsotionXFactor
        var bgImageNewWidth =  CGRectGetWidth(imageViewBG!.frame) + CGFloat(12.0)
        var bgImageNewHeight =  CGRectGetHeight(imageViewBG!.frame) + CGFloat(6.0)
        imageViewBG?.frame = CGRectMake(bgImageNewX, 0.0, bgImageNewWidth, bgImageNewHeight)
Let’s see whether our effort has yielded any result or not
Run the project (⌘ + R) to see the result.

Great, image and the chat text label have been properly aligned with the bubble image. But what about the left and right alignment of the bubble with the left and right edge of the screen? Are they properly maintained? Not yet!
Let’s try to keep a minimum distance from the edge of the screen. Paste the following code snippet below the one we added earlier.
        // Keepping a minimum distance from the edge of the screen
        var newStartX:CGFloat = 0.0
        if data.type == .Mine {
            // Need to maintain the minimum right side padding from the right edge of the screen
            var extraWidthToConsider = CGRectGetWidth(imageViewBG!.frame)
            newStartX = ScreenSize.SCREEN_WIDTH - extraWidthToConsider
        } else {
            // Need to maintain the minimum left side padding from the left edge of the screen
            newStartX = -CGRectGetMinX(imageViewBG!.frame) + 3.0
        }

        self.frame = CGRectMake(newStartX, CGRectGetMinY(self.frame), CGRectGetWidth(frame), CGRectGetHeight(frame))
Run the project. What you are seeing? You should get something like the one below.
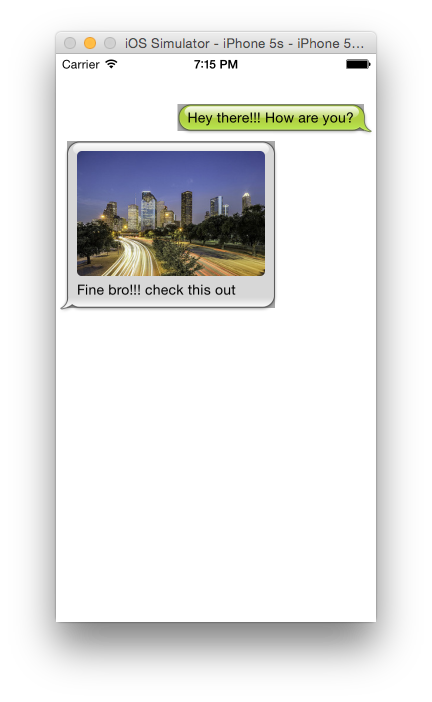
Got it right? ???? That nice! One more step, we are setting the background color of chat bubble as UIColor.clearColor() instead of present value UIColor.lightGrayColor()
Let’s check the final result.

That’s it folks!
Have a query on this tutorial? Please feel free to leave a comment below. If you are facing any problem while implementing the steps please download the fully configured project from GitHub.