Mixpanel Push Notification Integration with Ionic
Push notification is one of the feature of smartphone that makes it more smart. A service that constantly feed us with information from variety of apps. From Facebook Mentions to Instagram tags, from email to system notifications -the daily dose of information is designed to keep us updated and increase productivity.
And when developers asked to give their take on push notifications they start looking for the best integrators. Mixpanel is one such, which developers use for push notification integration.
In previous blog, I have explained Mixpanel Library Integration with Ionic, So I assumed to set up my second approach of Mixpanel Library Integration for Push Notification.
Note:- To provide some background on how push notifications work in Mixpanel, push notifications are sent based on a user’s device token. This token is specific to a user’s device and app instance and required by Apple/Google to deliver a push notification. Without this token, you will not be able to send a push
For Push Notification service, you should follow the below steps carefully –
Step 1: Add phonegap-plugin-push in your app
Go to your project directory in terminal and run the following command
cordova plugin add phonegap-plugin-push --variable SENDER_ID="XXXXXXX"
Note:- SENDER_ID: Google Sender ID (12 digit number which project number of newly created project in Google Developer Console)
Step 2: Initialize the phonegap-plugin-push and register to receive device token or Push ID from GCM and APNS based on Android and iOS devices
So, to run blocks in app.js, write PushNotification.init() and PushNotification.on() function. Take a look my implementation app.js
angular.module('starter', ['ionic'])
.run(function($ionicPlatform) {
  $ionicPlatform.ready(function() {
   /**
      Intilialize the phonegap-plugin-push
   **/
    var push = PushNotification.init({
      "android": {
        "senderID": "XXXXXXXXXXXX" // project token number (12 digit)
      },
      "ios": {
        "alert": "true",
        "badge": "true",
        "sound": "true"
      }
    });

    /**
     Register device with GCM/APNs
    **/
    push.on('registration', function(data) {
      // save device token in local storage
      (data.registrationId) && ($window.localStorage.registerPushId = data.registrationId)

    });

  });
})
Step 3: Update Android GCM API Key and Apple Push Certificate to Mixpanel
For mixpanel, here is Apple’s guide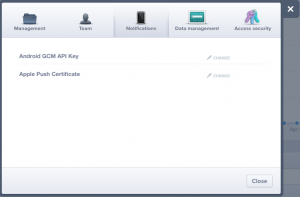 for creating a Universal Push Notification Client SSL Certificate that will work for development and production:
https://developer.apple.com/library/ios/documentation/IDEs/Conceptual/AppDistributionGuide/
Before proceed to Step 4, Please keep in mind that we need a people profile with the associated device token in order to send a push notification. This requires calling identify to identify a specific user and then setting a people property for the device token.
If you create a people profile and set the appropriate devices property with the user’s device token, then we will be able to send a push notification to their device.
Step 4: Create a people profile and set the appropriate device property while registration of the user in app
/**
    Send user profile to Mixpanel
**/
mixpanel.identify('user_identifier');
mixpanel.people.identify('user_identifier');
mixpanel.people.set({
    "$userId": 'user_identifier',
    "$first_name": 'first_name',
    "$last_name": 'last_name',
    "$email": 'user@email.com',
});

mixpanel.people.setPushId($window.localStorage.registerPushId, function() {
    console.log("success to set push id in mixpanel user specific console");
}, function() {
    console.log("error to set in mixpanel user specific console");
});
Step 5: Build and Run your App
If you start from scratch, then you just need to add platform, otherwise, first you remove platform and then add platform. Now, build your app and after that, install the app in your device by following process –
- Remove the old build from your iphone/Android
- Install the latest build in your device
- While you will do install app will ask for permission for push notification. Please allow this (iPhone)
- Login with your registered email. Then wait for a while before go to the next step; sometimes Mixpanel takes the time to update the device info.
Step 6: Send Push Notification based on user activity
Send Push Notification by following process –
- Check Mixpanel > Explore section that, your account details section, you are logged in or not. Just to confirm before go into next step to test push notification.
- Send push notification from Mixpanel for testing account.
This is it. Hope it helps. Feel free to comment if you face any problem while integrating Push Notification Service with Mixpanel. Any suggestion for improvement will be appreciated.