Pinterest Style Mosiac Image Gallery in iOS
Often in iOS apps we need to represent images through gallery . Pinterest Style Mosiac View is one of those gallery representation style . Some people called this pattern as Waterfall View also. As we need this view pattern in various apps, we can make it generic by creating a UIView which will represent the Mosiac View. By doing this kind of thing we can use it anywhere we want . It may be full screen view or part of the screen.
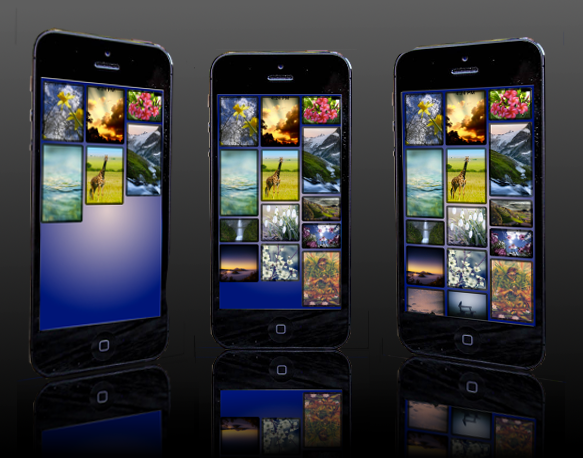
Demo
[button link=”https://github.com/innofied/waterfallview” linking=”new-window” size=”medium” type=”simple” title=”Download” label=”Download”]Download[/button]
Prerequisite:
Required basic idea in
Getting Started:
First create project step by step ::
- Create a single view project from your XCode IDE . If you want more details about how to create a project, check this link: Creating an Xcode 4.2 Single View Project
- Create three group named “Category” “View” “Controller”.
- Move the ViewController .h and .m file to Controller group.
- Create a new file named ‘MKWaterfallView‘ in “View” group by extending UIView.
- In “Category” group create a category of “UIImage” and name it as “TagAndResize“
- In “Category” group create another category of “NSURL” and name it as “Tag”
When we download image from any url, then we don’t know about the height and width of the image . So, we may crop this image according to our UIImageView size or we will allocate one by one dynamically. Here, we allocate images dynamically. We will create threads for all urls and waiting for them to be downloaded. When anyone of them finishes loading ,it will be assigned to UIImageView of any column who has minimum height. This is the main idea of this project. But there is a problem . When we create threads we loose the image’s index in array. So, When user tap on an image we can’t recognize the exact one. To remove this problem we use category of “UIImage” and “NSURL“. By ‘Tag” we can identify them.
Category ::
As we know Category does not allow any property . So we will do it by storing those data in run-time AssociatedObject. If you want learn more about storing properties in category, check this link: Faking instance variables in Objective-C categories with Associative References
Write the following code in NSURL+Tag.h file :
#import <Foundation/Foundation.h>

@interface NSURL (Tag)
-(void)setTag:(int)tag;
-(int) tag;
@end
Write the following code in NSURL+Tag.m file :
#import "NSURL+Tag.h"
#import <objc/runtime.h>

static char const * const ObjectTagKey = "ObjectTag";
@implementation NSURL (Tag)

-(void)setTag:(int)tag
{
    objc_setAssociatedObject(self, ObjectTagKey, [NSNumber numberWithInt:tag], OBJC_ASSOCIATION_RETAIN);
}
-(int) tag
{
    return [objc_getAssociatedObject(self, ObjectTagKey) intValue];
}
@end
UIImage+TagAndResize ::
When we download image from internet , image can have different size. Before placing them to gallery we need to re-size them maintaining aspect ratio of all those images. For “Tag” code will be same as “NSURL+Tag”.
To resize any image with constant width :
- calculate scaleFactor by dividing newWidth by oldWidth
- multiply scaleFactor with oldWidth and oldHeight
- resize the image with new width and height from Context. Want more: “Creating New Images Using Bitmap Graphics Contexts”
If you want a video tutorial about image resizing, check this link: “Resizing Image”
Write the following code in UIImage+TagAndResize.h file :
#import <UIKit/UIKit.h>

@interface UIImage (TagAndResize)
-(void)setTag:(int)tag;
-(int) tag;
- (UIImage*)imageScaledToWidth: (float) i_width;
@end
Write the following code in UIImage+TagAndResize.m file :
#import "UIImage+TagAndResize.h"
#import <objc/runtime.h>

static char const * const ObjectTagKey = "ObjectTag";
@implementation UIImage (TagAndResize)

-(void)setTag:(int)tag
{
    objc_setAssociatedObject(self, ObjectTagKey, [NSNumber numberWithInt:tag], OBJC_ASSOCIATION_RETAIN);
}

-(int) tag
{
    return [objc_getAssociatedObject(self, ObjectTagKey) intValue];
}

/*********************************************************************
 **         It return an image of a fixed width
 **
 *********************************************************************/
- (UIImage*)imageScaledToWidth: (float) i_width
{
    //------------------------------------------
    // Task :
    // 1. calculate scaleFactor
    // 2. multiple with width and height
    // 3. resize the image with new width and height
    //------------------------------------------

    float oldWidth = self.size.width;
    float scaleFactor = i_width / oldWidth;

    float newHeight = self.size.height * scaleFactor;
    float newWidth = oldWidth * scaleFactor;

    UIGraphicsBeginImageContext(CGSizeMake(newWidth, newHeight));
    [self drawInRect:CGRectMake(0, 0, newWidth, newHeight)];
    UIImage *newImage = UIGraphicsGetImageFromCurrentImageContext();
    UIGraphicsEndImageContext();

    return newImage;

}
@end
Pinterest Style Mosiac View Implementation :
MKWaterfallView ::
As we know that WaterfallView is basically a UIScrollView. So, we are going to declare “scrollViewOfImages” as property and it is public so that all the imageView those will be attached upon it, can be accessed from any other viewController. Further we declare several properties to customize the Waterfall View according to the user’s requirement. Like widthOfGapBtnColumnsInScrollView, widthOfGapBtnViewColumnsInScrollView etc. All property declared here are self-explanatory .
Write the following code in MKWaterfallView.h file :
#import <UIKit/UIKit.h>
#import "NSURL+Tag.h"
#import "UIImage+TagAndResize.h"

@interface MKWaterfallView : UIView

@property (strong, nonatomic)   UIScrollView    *scrollViewOfImages;

//-----------------------------------------------------------------
//  Following properties must be set by the user before method call
//-----------------------------------------------------------------
@property ( nonatomic) float widthOfGapBtnColumnsInScrollView;
@property ( nonatomic) float widthOfGapBtnViewColumnsInScrollView ; // Gap between column and UIView border
@property ( nonatomic) float heightOfGapBtnImageOfSameColumn;
@property ( nonatomic) float widthOfColumnInScrollView ; // Each Column's width

//-----------------------------------------------------------------
//  Following properties need to be set as requirement
//-----------------------------------------------------------------
@property ( nonatomic) NSInteger widthOfBorderSurroundedImage;
@property ( nonatomic) UIColor  *colorOfBorderSurroundedImage;
@property ( nonatomic) NSInteger cornerRadiusOfImage;
@property ( nonatomic) BOOL      isMaskedTheCornerOfImage;

//-----------------------------------------------------------------
//  Following property need to be set as requirement
//-----------------------------------------------------------------
@property ( nonatomic) UIImage  *backgroundImage;  //BackgroundImage which will be assign as ScrollView's back ground

//-----------------------------------------------------------------
//  If you have several image URL and need show them in waterfall
//  view then use the below method
//-----------------------------------------------------------------
- (void) addSubviewToScrollViewFromImageUrlStringArray:(NSArray *)arrayOfImageUrlStringSource
                                            OfColumnNo:(int)noOfColumn;

@end
In MKWaterfallView.m first we need to synthesize all the properties. Here need some private variables e.g image, noOfImage, arrayOfColumnHeight, backgroundImageView.
- UIImage *image; — to display image after completion of download
- int noOfImage; — to get the total count of images
- NSInteger arrayOfColumnHeight[10]; — From above, we can see, that whenever an image will be downloaded , it will be placed in the column with minimum height. To store all those height we need this array.
- UIImageView *backgroundImageView; — the screen behind the scrollView.
Write the following code in MKWaterfallView.m file :
#import "MKWaterfallView.h"
@interface MKWaterfallView()
{
UIImage *image ;
int noOfImage;
NSInteger arrayOfColumnHeight[10];
UIImageView *backgroundImageview;
}
@end
@implementation MKWaterfallView
@synthesize scrollViewOfImages;
@synthesize widthOfColumnInScrollView;
@synthesize widthOfGapBtnColumnsInScrollView;
@synthesize widthOfGapBtnViewColumnsInScrollView;
@synthesize heightOfGapBtnImageOfSameColumn;
@synthesize widthOfBorderSurroundedImage;
@synthesize colorOfBorderSurroundedImage;
@synthesize cornerRadiusOfImage;
@synthesize isMaskedTheCornerOfImage;
@synthesize backgroundImage;
- (id)initWithFrame:(CGRect)frame
{
self = [super initWithFrame:frame];
if (self) {
// Create scroll view and add with view
scrollViewOfImages = [[UIScrollView alloc] initWithFrame:frame];
backgroundImageview = [[UIImageView alloc] initWithFrame:frame];
[self addSubview:backgroundImageview];
[self addSubview:scrollViewOfImages];
}
return self;
}
- (void) addSubviewToScrollViewFromImageUrlStringArray:(NSArray *)arrayOfImageUrlStringSource
OfColumnNo:(int)noOfColumn
{}
-(void) initializeColumnHeight
{
for (int i=0; i< 10; i++) {
arrayOfColumnHeight[i] = self.widthOfGapBtnViewColumnsInScrollView;
}
}
@end
Now we will write code for downloading images and creating imageView and assign them to UIScrollView. Following code is to be added within – (void) addSubviewToScrollViewFromImageUrlStringArray:(NSArray *)arrayOfImageUrlStringSource OfColumnNo:(int)noOfColumn method.
We need to set the backgroundImage of the scrollView and then initialize the arrayOfColumnHeight by calling the method [self initializeColumnHeight].
Then we need to check if the arrayOfImageUrlStringSource is empty or not and generate alert accordingly.
    backgroundImageview.image = backgroundImage;
    [self initializeColumnHeight];

    // Check if user set arrayOfUIImageSource or not
    if (arrayOfUIImageSource == nil ||[arrayOfUIImageSource count] == 0) {

        UIAlertView *alertMessageOnEmptyarrayOfImageUrlStringSource = [[UIAlertView alloc]
                                                                 initWithTitle:@"Alert Message"
                                                                 message:@"Please send a proper array"
                                                                 delegate:self
                                                                 cancelButtonTitle:@"ok"
                                                                 otherButtonTitles: nil];
        [alertMessageOnEmptyarrayOfImageUrlStringSource show];
        return;
    }
Now we need to download all the images one by one with in for loop. Here, image get downloaded in a separate thread.
- First create a dispatch_queue_t variable which is a new thread.
- Then, start it by invoking dispatch_async method and write necessary code for downloading image inside it.
- You will find in the block the main thread being invoked to perform the task regarding User Interface updates e.g. place the image in imageView.
To learn more about lazy loading and Multithreading in ios , check this link : Stanford University – iPhone Programming Tutorial 13 – Blocks and Multithreading at 39:00 minutes or a short tutorial Lazy Loading of Image .
    for (int i=0;i<[arrayOfImageUrlStringSource count];i++)
    {
        dispatch_queue_t imageFatcherQ = dispatch_queue_create("imageFatcher", nil);
        dispatch_async(imageFatcherQ, ^{

            //-----------------------------
            // Download image from internet
            //-----------------------------
            NSURL *imageUrl = [[NSURL alloc] initWithString:[arrayOfImageUrlStringSource objectAtIndex:i]];

            NSData *imageData = [[NSData alloc] initWithContentsOfURL:imageUrl];

            image = [UIImage imageWithData:imageData];

            dispatch_async(dispatch_get_main_queue(), ^{

                image = [image imageScaledToWidth:widthOfColumnInScrollView];
            });
        });
    }
To recognize each image we need to set “Tag”. Write the following line of code after NSURL *imageUrl = …;
[imageUrl setTag:i];
Then add the following code after image = [UIImage imageWithData:imageData]; line
[image setTag:[imageUrl tag]];
Then add the following code before image = [image imageScaledToWidth:widthOfColumnInScrollView]; line
int individual = [image tag];
Now define some variable as following code and we need to find out the column with minimum height.
We already know that there are several columns in Pinterest style Mosiac-View. We need to add newly downloaded image to the column with minimum height , so that gallery looks better.
                NSInteger minimumHeightColumnIndex = 0; // first column index 0
                NSInteger minimumHeight=20000;
                NSInteger maximumHeight=0;
                NSInteger minimumHeightX;

                for (int j=0; j < noOfColumn; j++) {

                    if (minimumHeight > arrayOfColumnHeight[j])
                    {
                        minimumHeight = arrayOfColumnHeight[j];
                        minimumHeightColumnIndex = j;
                    }

                }

                minimumHeightX = widthOfGapBtnViewColumnsInScrollView + minimumHeightColumnIndex*( widthOfGapBtnColumnsInScrollView + widthOfColumnInScrollView );
Now we will set frame of UIImageView where the downloaded image will be set.
                CGRect imageFrame = CGRectMake(minimumHeightX, minimumHeight, image.size.width, image.size.height);
                UIImageView *imageView=[[UIImageView alloc]initWithFrame:imageFrame];
All the properties that will be set by the viewController need to be assigned with imageView and add imageView to scrollViewOfImages.
imageView.image = image;
imageView.layer.borderWidth   = widthOfBorderSurroundedImage;
imageView.layer.borderColor   = colorOfBorderSurroundedImage.CGColor;
imageView.layer.cornerRadius  = cornerRadiusOfImage;
imageView.layer.masksToBounds = isMaskedTheCornerOfImage;
imageView.tag =individual;
NSLog(@"###image tag %i",individual);
[self.scrollViewOfImages addSubview:imageView];
Store new height to arrayOfColumnHeight , so that we can track every column’s height.
                minimumHeight = imageFrame.origin.y+image.size.height+heightOfGapBtnImageOfSameColumn;
                arrayOfColumnHeight[minimumHeightColumnIndex] = minimumHeight;
Now set scrollViewOfImage‘s content size to the height of the column with maximum height, so that all the downloaded images are visible within the gallery.
                for (int j=0; j < noOfColumn; j++)
                {
                    if (maximumHeight < arrayOfColumnHeight[j])
                    {
                        maximumHeight = arrayOfColumnHeight[j];
                    }
                }

                self.scrollViewOfImages.contentSize=CGSizeMake(self.scrollViewOfImages.frame.size.width,maximumHeight);
MKViewController ::
Add the following code for MKViewController.h
#import <UIKit/UIKit.h>
#import "MKWaterfallView.h"
@interface MKViewController : UIViewController
@property (strong, nonatomic) MKWaterfallView *scrollView;
@property (strong, nonatomic) NSMutableArray *imageUrlArray;
@end
Add the following code in MKViewController.m ‘s implementation section.
{
    CGFloat widthOfScreen ;
    CGFloat heightOfScreen ;
    UITapGestureRecognizer *recognizer;
    CGRect frameOfScreen;
}
@synthesize scrollView;
@synthesize imageUrlArray;

- (void)willAnimateRotationToInterfaceOrientation:(UIInterfaceOrientation)toInterfaceOrientation duration:(NSTimeInterval)duration
{}
- (void) tapGestureRecognized:(UITapGestureRecognizer*)gesture
{}
- (void) addUrlToImageUrlArray
{
    [imageUrlArray addObject:@"http://www.whitegadget.com/attachments/pc-wallpapers/25222d1235656623-nature-photos-wallpapers-images-beautiful-pictures-nature-mountains-photo.jpg"];
    [imageUrlArray addObject:@"http://3.bp.blogspot.com/-YmEyAa4elTo/UDtaclzno9I/AAAAAAAAC-w/JsqwSuoj260/s1600/Beautiful-Nature.jpg"];
    //...more image
}
@end
To support any size of screen we need to get the widthOfScreen and heightOfScreen. So add the private method within implementation section .
- (void) getScreenSize
{
    // get screen size
    frameOfScreen = [[UIScreen mainScreen] bounds];
    widthOfScreen = frameOfScreen.size.width;
    heightOfScreen = frameOfScreen.size.height;
    NSLog(@"widthOfScreen : %f heightOfscren %f",widthOfScreen,heightOfScreen);
}
To assign object to scrollView we need to define a another private method which will assign all the required value for WaterfallView.
- (void) scrollViewWithNoOfColumn:(int)noOfColumn
{
    // get Device Screen size to support all type of screens
    [self getScreenSize];

    if (noOfColumn > 4) {
        // For Landscape view
        scrollView = [[MKWaterfallView alloc] initWithFrame:CGRectMake(0, 0, heightOfScreen   , widthOfScreen)];
        // (heightOfScreen - 30) As set noOfColumn 5 for landscape view ,So there are 6 gaps. 6 * 5 = 30
        // rest portion for image.
        scrollView.widthOfColumnInScrollView           =(heightOfScreen-30)/noOfColumn;
    } else {
        // For Portrait view
        scrollView = [[MKWaterfallView alloc] initWithFrame:CGRectMake(0, 0, widthOfScreen   , heightOfScreen)];
        scrollView.widthOfColumnInScrollView           =(widthOfScreen-20)/noOfColumn;
    }

    scrollView.widthOfGapBtnColumnsInScrollView    =5;
    scrollView.widthOfGapBtnViewColumnsInScrollView=5;
    scrollView.heightOfGapBtnImageOfSameColumn     =5;

    scrollView.widthOfBorderSurroundedImage        =5;
    scrollView.colorOfBorderSurroundedImage        =[[UIColor blackColor] colorWithAlphaComponent:.65];
    scrollView.cornerRadiusOfImage                 =5;
    scrollView.isMaskedTheCornerOfImage            =YES;

    scrollView.backgroundImage                     = [UIImage imageNamed:@"backGround.png"];
    [self.view addSubview:scrollView];

    // add Images to the View
    [self.scrollView addSubviewToScrollViewFromImageUrlStringArray:imageUrlArray OfColumnNo:noOfColumn];

    // add TapGestureRecognizer
    [self.scrollView.scrollViewOfImages addGestureRecognizer:recognizer];
}
In viewDidLoad after [super viewDidLoad]; we need to create object of imageUrlArray and invoke addUrlToImageUrlArray,
then create object of UITapGestureRecognizer and then call the above method with noOfColumn value 3.
    imageUrlArray = [[NSMutableArray alloc] initWithCapacity:1];
    [self addUrlToImageUrlArray];

    recognizer = [[UITapGestureRecognizer alloc] initWithTarget:self action:@selector(tapGestureRecognized:)];

    [self scrollViewWithNoOfColumn:3];
To support landscape and portrait mode add the following code in – (void)willAnimateRotationToInterfaceOrientation:(UIInterfaceOrientation)toInterfaceOrientation duration:(NSTimeInterval)duration
if (toInterfaceOrientation == UIInterfaceOrientationLandscapeLeft ||
        toInterfaceOrientation == UIInterfaceOrientationLandscapeRight)
    {
        // LandScape mode

        // remove the earlier view
        [self.scrollView removeFromSuperview];

        // create new view
        [self scrollViewWithNoOfColumn:5];

        NSLog(@"Change to custom UI for landscape");

    }
    else if (toInterfaceOrientation == UIInterfaceOrientationPortrait ||
             toInterfaceOrientation == UIInterfaceOrientationPortraitUpsideDown)
    {
        // Portrait mode

        [self.scrollView removeFromSuperview];

        [self scrollViewWithNoOfColumn:3];

        NSLog(@"Change to custom UI for portrait");

    }
Now add the following code in – (void) tapGestureRecognized:(UITapGestureRecognizer*)gesture
to know which image gets tapped by the user.
    CGPoint tapLocation = [gesture locationInView:scrollView.scrollViewOfImages];
    int i = 0;
    for (UIView *viewLocal in self.scrollView.scrollViewOfImages.subviews) {

        if (CGRectContainsPoint(viewLocal.frame, tapLocation)) {

            UIAlertView *alert = [[UIAlertView alloc] initWithTitle:@"Message" message:[NSString stringWithFormat:@"You have clicked on %ld",(long)viewLocal.tag] delegate:self cancelButtonTitle:@"Ok" otherButtonTitles: nil];
            [alert show];

            break;
        }
        i++;
    }
Now, run the project by clicking ctrl+R.
[button link=”http://www.youtube.com/watch?v=84yexT6QMJc” linking=”new-window” size=”medium” type=”simple” title=”Mosaic Image Gallery with ios”]Demo[/button] [button link=”https://github.com/innofied/waterfallview” linking=”new-window” size=”medium” type=”simple” title=”Download” label=”Download”]Download[/button]