Infinite background parallax effect is quite popular in games. It creates an illusion of speed for foreground game objects. Actually the foreground game objects are static in nature and the game background moves towards left slowly. This situation causes the illusion of speed towards the right direction for foreground game objects.
But creating an infinite parallax effect for a game background is tricky. If you are familiar with the open source, 2d game development framework Cocos2d-swift, then this blog is just for you.
Before You Start:
Before you start, you need to download the scratch project from GitHub. Open the project in Xcode. Explore it in Project Navigator. You will see a tree like structure as shown in the screenshot below.
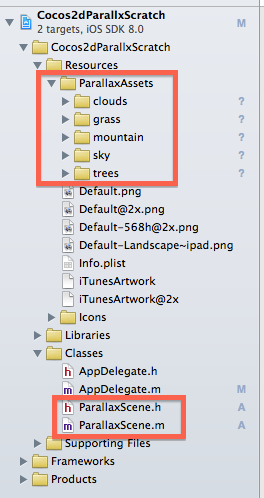
Make sure that you have all the image assets in the ParallaxAssets folder under Resources. You also need to be sure about the ParallaxScene.h and ParallaxScene.m file under the classes FileGroup.
What is Parallax?
Before we start learning more about parallax effect let’s take a closer look on the effect. The following may be helpful for understanding the parallax effect.

What you see is Parallax effect. Let’s find out the moving objects.
- Clouds
- Funny Cactuses.
- Grass.
Is there anything special?
Did you notice the speed of the moving elements? Yes, it is the main aspect of Parallax Effect. The farthest object has the minimum speed and the nearest one moves at maximum speed.
What’s wrong with CCParallaxNode for infinite parallax effect?
You might be thinking about CCParallaxNode, the Cocos2d frameworks class to implement the parallax effect. You can find its usage on StackOverflow. But the problem with it is: it does not support infinite parallax. You need to perform move and reposition action on the parallax node. This often leads to another issue; flickering problem might arise if the width of various layers are not managed properly.
What’s the strategy behind the infinite parallax effect?

How to implement the infinite parallax effect on a single CCSprite which is small comparable to the screen?
Steps:
- Initial Left Move: Move the sprite just out side of the left edge of the game scene so that it is not visible.
- Repositioning Move: Reposition the sprite just out side of the right edge of the game scene to make it prepared for next move to the left edge of the game scene .
- Left Move: Move sprite to the left edge of the game screen.
- Repositioning: Repositioning sprite as specified in 2.

How to implement parallax on this Grass Layer Sprite? What about this strategy?
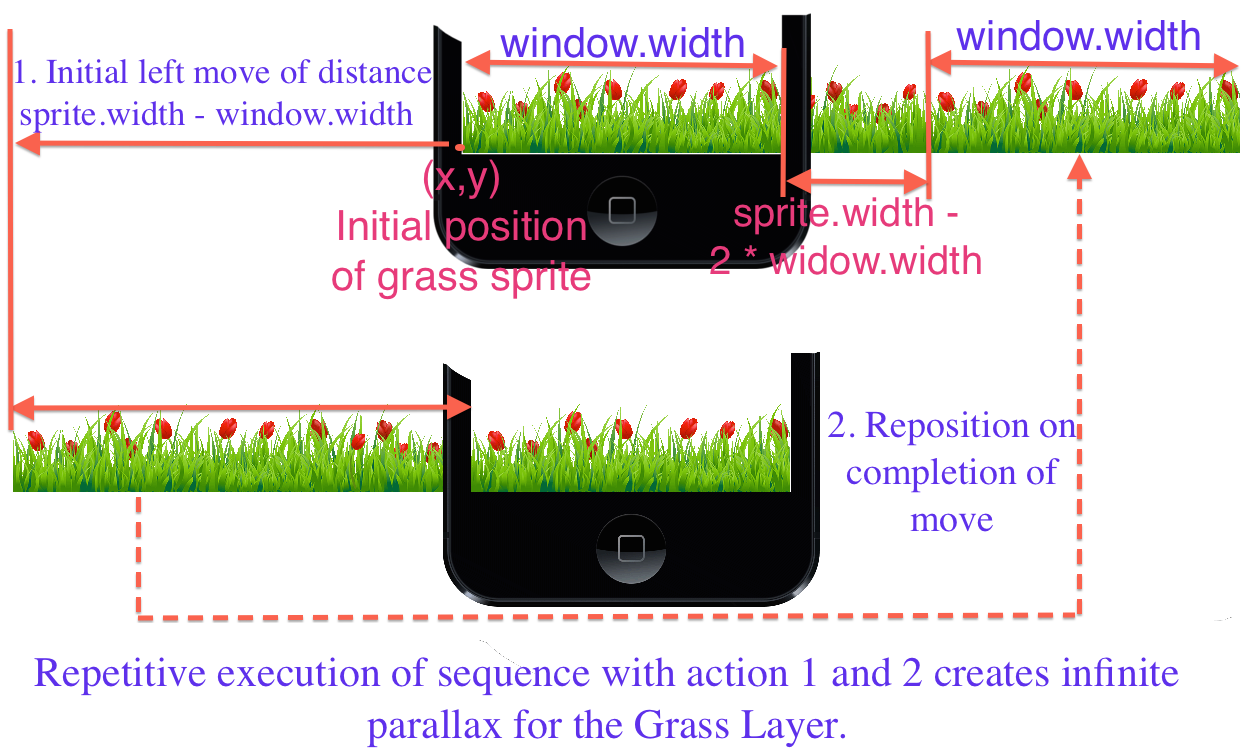
N.B: To avoid flickering you must ensure that first window.width pixel and last window.width pixel of these layer sprite image assets must superimpose on each other.
Now you have the complete idea of creating infinite parallax for small sprite like cloud and large background sprite like grass layer.
Let’s start writing the code
We will need a singleton ParallaxManager which will implement all these infinite parallax effect on small sprite as well as large layer sprite. Create a new file with [Command + N]. Type CCNode as the parent class. Name the class as ParallaxManager.
Now replace the content of the ParallaxManager.h with the following code.
//
//  ParallaxManager.h
//  Cocos2dParallax
//
//  Created by Sauvik Dolui on 10/8/14.
//  Copyright 2014 Innofied Solution Pvt. Ltd. All rights reserved.
//

#import <Foundation/Foundation.h>
#import "cocos2d.h"

@interface ParallaxManager : CCNode {
    CGSize viewSize;
}

+(instancetype)sharedManager;
-(void) applyParallaxOnScreenSprite:(CCSprite*) sprite withDuration:(float) parallaxDuration;
-(void) applyParallaxOnLayer:(CCSprite*) layer withDuration:(float)parallaxDuration leftSize:(BOOL)leftSide;

@end
And replace the content of ParallaxManager.m with the following code.
//
//  ParallaxManager.m
//  Cocos2dParallax
//
//  Created by Sauvik Dolui on 10/8/14.
//  Copyright 2014 Innofied Solution Pvt. Ltd. All rights reserved.
//

#import "ParallaxManager.h"


@implementation ParallaxManager

+(instancetype)sharedManager
{
    static ParallaxManager * manager;
    static dispatch_once_t onceToken;
    dispatch_once(&onceToken, ^{
        manager = [[self alloc]init];
    });

    return manager;
}

-(instancetype)init
{
    if (self = [super init]) {
        // Initialization Code
        viewSize = [CCDirector sharedDirector].viewSize;
    }

    return self;
}
-(void) applyParallaxOnScreenSprite:(CCSprite*) sprite withDuration:(float) parallaxDuration
{
    // Move and repositioning functions

    // 1. Initial move to the left edge of the window
    CCActionMoveBy *initialMove = [CCActionMoveBy actionWithDuration:parallaxDuration
                                                            position:ccp(-(sprite.contentSize.width/2 + sprite.position.x),0.0f)];

    // 2. Defining the complex parallax effect by two actions
    //      a. Repositioning the sprite at just outside of the right edge of the game scene after completing the initial move action.
    //      b. Repeatative execution of the sequence of these two following sub-actions
    //          i. Moving to the left side of the game window, so that the sprite is just out side of the screen.
    //         ii. Repositiong the sprite so that it comes just out side of the screen.

    CCActionCallBlock *parallaxEffectAction = [CCActionCallBlock actionWithBlock:^{

        // 2.a.
        // After completing the move to the left side edge of the window repositioning
        // sprite so that it is just out side the right edge of the screen
        sprite.position = ccp(viewSize.width + sprite.contentSize.width/2, sprite.position.y);

        // Calculating the speed of the sprite
        float pixelSpeed = (sprite.contentSize.width + sprite.position.x) / parallaxDuration;
        // 2.b.i.
        CCActionMoveBy *spriteMove = [CCActionMoveBy actionWithDuration:(viewSize.width + sprite.contentSize.width *2)/pixelSpeed
                                                               position:ccp(-(viewSize.width + sprite.contentSize.width),0.0f)];
        // 2.b.ii.
        CCActionCallBlock *repositionSprite = [CCActionCallBlock actionWithBlock:^{
            sprite.position = ccp(viewSize.width + sprite.contentSize.width / 2 , sprite.position.y);
        }];

        // Making sequence of actions 2.b.1. and 2.b.ii.
        CCActionSequence *moveAndReposition = [CCActionSequence actionOne:spriteMove two:repositionSprite];

        // Repeatative execution of the move and reposition actions
        [sprite runAction:[CCActionRepeatForever  actionWithAction:moveAndReposition]];
    }];

    // Execution of two primary actions 1. Initial move to the left side of the window and 2. Parallax action
    [sprite runAction:[CCActionSequence actionOne:initialMove two:parallaxEffectAction]];
}

-(void) applyParallaxOnLayer:(CCSprite*) layer withDuration:(float)parallaxDuration leftSize:(BOOL)leftSide
{
    CGPoint initialPosition = layer.position;

    float moveDistance = 0.0f;
    if (leftSide) {
        moveDistance = - (layer.contentSize.width - viewSize.width );
    }
    else{
        moveDistance = (layer.contentSize.width - viewSize.width);
    }

    // Move and repositioning function

    // 1. Move to the edge of the window
    CCActionMoveBy *move = [CCActionMoveBy actionWithDuration:parallaxDuration position:ccp(moveDistance ,0.0f)];

    // 2. Repositioning again preparing it for the next move
    CCActionCallBlock *reposition = [CCActionCallBlock actionWithBlock:^{
        layer.position = initialPosition;
    }];

    // Scequence of move and reposition actions
    CCActionSequence *moveAndReposition = [CCActionSequence actionOne:move two:reposition];

    // Repeatative execution of the move and reposition action
    [layer runAction:[CCActionRepeatForever  actionWithAction:moveAndReposition]];
}
@end
Next, you must go through the code of the functions
-(void) applyParallaxOnScreenSprite:(CCSprite*) sprite withDuration:(float) parallaxDuration;
-(void) applyParallaxOnLayer:(CCSprite*) layer withDuration:(float)parallaxDuration leftSize: (BOOL)leftSide;
Comments in the code clarify the implementation of strategies as we have discussed earlier.
Before you start writing code to add image sprite on ParallaxScene add the following device determining macros in your Prefix.h file.
// MACROS DETERMINING DEVICE SPECIFICATIONS
#define IS_IPAD (UI_USER_INTERFACE_IDIOM() == UIUserInterfaceIdiomPad)
#define IS_IPHONE (UI_USER_INTERFACE_IDIOM() == UIUserInterfaceIdiomPhone)
#define IS_IPHONE5 (IS_IPHONE && [[UIScreen mainScreen] bounds].size.height == 568.0f) #define IS_RETINA ([[UIScreen mainScreen] respondsToSelector:@selector(displayLinkWithTarget:selector:)] && ([UIScreen mainScreen].scale == 2.0))
Now, to access these macros, clean your project by [Command + Shift + K]. Because any modification in .pch (Pre-Compiled Header) file are not effective until the project is cleaned.
Now replace the content of the ParallaxScene.h file with the following code
#import <Foundation/Foundation.h>
#import "cocos2d.h"
@interface ParallaxScene : CCScene {
   CGSize viewSize;
}
+(CCScene*)scene;
@end
Do the same for the ParallaxScene.m file using the following code
#import "ParallaxScene.h"
#import "ParallaxManager.h"
#define Z_ORDER_SKY (-5)
#define Z_ORDER_CLOUD (-4)
#define Z_ORDER_MOUNTAIN (-3)
#define Z_ORDER_TREES (-2)
#define Z_ORDER_GRASS (-1)
@implementation ParallaxScene +(CCScene*)scene{
   return [[self alloc]init];
 }
-(instancetype)init{
   if (self = [super init]) {
     viewSize = [CCDirector sharedDirector].viewSize;
   }
   return self;
}
@end
Those #define Macros defines the Z-Oders of the sprite images to be added on this game scene. Sprite drawn with less Z-Oder, added at lower layer of the game scene.
Before we add the first cloud sprite to our game scene make sure you ParallaxAssets file group contains all the image asset files.

Hope that you are seeing all the image assets as shown in the above two pictures. Let’s add some background components such as Sky, Clouds, Mountains, Trees etc.
1. Adding Sky as a background component
Find this code in the init method of ParallaxScene.m.
viewSize = [CCDirector sharedDirector].viewSize;
Below the above code, add following code block:
// 1. Adding the sky as the scene background
NSString *skyFileName = @"sky";
if (IS_IPHONE5) {
  skyFileName = [skyFileName stringByAppendingString:@"Wide"];
}
CCSprite *sky = [CCSprite spriteWithImageNamed:[skyFileName stringByAppendingString:@".png"]];
sky.positionType = CCPositionTypeNormalized;
sky.position = ccp(0.5,0.5);
[self addChild:sky z:Z_ORDER_SKY];
It just adds the proper version of the sky depending upon the device type. (Wide Version of the sky is taken for iPhone5).Now create the singleton ParallaxManager object using the following code.
???// Lets create the singleton parallax manager
ParallaxManager *parallaxManager = [ParallaxManager sharedManager];
2. Adding some clouds with infinite parallax effect
// 2. Adding some clouds
// Cloud 1
CCSprite *cloud1 = [CCSprite spriteWithImageNamed:@"cloud1.png"]; cloud1.position = ccp(viewSize.width * 0.5f, viewSize.height * 0.85f); // Initial Position [self addChild:cloud1 z:Z_ORDER_CLOUD];
// Cloud 2
CCSprite *cloud2 = [CCSprite spriteWithImageNamed:@"cloud2.png"]; cloud2.position = ccp(viewSize.width * 0.2f, viewSize.height * 0.58f); // Initial Position [self addChild:cloud2 z:Z_ORDER_CLOUD];
// Cloud 3
CCSprite *cloud3 = [CCSprite spriteWithImageNamed:@"cloud3.png"]; cloud3.position = ccp(viewSize.width * 0.4f, viewSize.height * 0.75f); // Initial Position [self addChild:cloud3 z:Z_ORDER_CLOUD];

// Lets try to add parallax effect on the three clouds
[parallaxManager applyParallaxOnScreenSprite:cloud1 withDuration:40.0]; // Cloud 1
[parallaxManager applyParallaxOnScreenSprite:cloud2 withDuration:37.0]; // Cloud 2
[parallaxManager applyParallaxOnScreenSprite:cloud3 withDuration:33.0]; // Cloud 3
Now run your project by [Command + R].You should see something like this.
3. Love mountains – here you go
Only Sky and Clouds are not enough. Let’s add mountains as a background component to make it more real. Here is the code for that:
// Adding mountain
CCSprite *mountain = [CCSprite spriteWithImageNamed:@"mountain.png"]; mountain.anchorPoint = ccp(0.0f,0.0f);
mountain.position = ccp(0.0,0.04 * viewSize.height); // Initial Position
[parallaxManager applyParallaxOnLayer:mountain withDuration:130.0 leftSize:YES]; // Applying parallax
[self addChild:mountain z:Z_ORDER_MOUNTAIN];
Run your project again. You must see something like this:
4. Trees and Grass
Should we add some cool trees and grass layer? Do we have the image assets stored in the right folder? Yes we have. So, just append the following code in the body of init().
// 3. Trees
CCSprite *trees = [CCSprite spriteWithImageNamed:@"trees.png"]; trees.anchorPoint = ccp(0.0,0.0f);
trees.position = ccp(0.0f,0.03 * viewSize.height); // Initial Position
[parallaxManager applyParallaxOnLayer:trees withDuration:55.0 leftSize:YES]; // Applying parallax
[self addChild:trees z:Z_ORDER_TREES];
?
// Adding some grass layer
CCSprite *grass = [CCSprite spriteWithImageNamed:@"grass.png"];
grass.anchorPoint = ccp(0.0,0.0f); // Initial Position
grass.position = ccp(0.0f,0.0f);
[parallaxManager applyParallaxOnLayer:grass withDuration:30.0 leftSize:YES]; // Applying parallax
[self addChild:grass z:Z_ORDER_GRASS];
On run your project and you can see the result like that
Where to go from here?
If you get stuck at any point, download the working project from GitHub. I hope you learned some cool new tricks to implement infinite parallax in Cocos2d games. To learn more about Cocos2d you can find a cool book from here, for any class reference, go to Cocos2D Developer Library Reference. If you have any question or comment on this tutorial, please feel free to ask or leave a comment.