React Native: Top 10 Best Practices We Follow at Innofied
Updated on ‘Aug 16, 2019’
“Change is the only Constant”. Well, this quote fits really well in the world of mobile app development. No wonder why there is a buzz for new technologies every now and then. Developers are looking for technologies that has a quick deployment time, shorter development cycles, and deliver better app performance. Hence, everyone wants to create apps that provide seamless user experience, are faster to develop, and can run on more than one platforms.
And guess what came? React Native- a framework designed by Facebook is upping the ante for mobile apps.
So What Is React Native And How It Came?
React Native is been in the market for 2 years now and is literally taking over the development process. It is used for building Native Android and iOS Mobile apps using JavaScript and React. React is a JavaScript Library for creating UI. Since React leverages the Complex UI to Component-based UI, we can utilize the same small UI component into react native iOS and Android apps.
Instead of recompiling, you can reload react native app instantly. With hot reloading, you can even run new code while retaining our application state.
The primary focus of React Native is on developer efficiency across iOS and Android platforms you care about – learn once, write anywhere.
Whether you want to want to create an uber for laundry service, a remarkable medical marijuana app, a feature rich food delivery app or uber for any on demand industry, React Native is the answer.
Related read: Following S.O.L.I.D – The 5 Object Oriented Principles in React Native Architecture
Now in React and React Native there are many best practices to follow for getting the best result of React Native. And deliver the Native mobile apps using javascript. Let’s talk on the top ten react native best practices.
Top 10 React Native Best Practices To Follow
1. Classify The Component First
Component should be broken down into two main categories –
Presentation Component
- It is concerned with how things look and allow containment via this.props.children
- Styles have to be implemented
- Don’t specify how data is loaded or mutated
- Receive data and callbacks exclusively via props.
Container Component
- It is concerned with how things work
- Use Higher Order Component for wrapping divs
- It provides presentational or other container components with data and behavior.
- Are often stateful
2. Use Functional Component For Stateless Presentational Component
Since Stateless Presentational Component is only dealing with only styles and UI, we should use functional component for this.
import React from 'react';
import { Text, View } from 'react-native';

const Button = ({ btnName }) => {
  const {
    containerStyle,
    textStyle
  } = styles;

  return (
   <View style={containerStyle}>
      <Text style={textStyle}>{btnName}</Text>
    </View>
  );
};
const styles = {
  containerStyle: {
    flex: 1,
    justifyContent: 'center',
    alignItems: 'center',
    margin
  },
  textStyle: {
    textAlign: 'center',
    fontSize: 25,
    fontFamily: fonts.bold,
    color: colors.grayLight,
    margin
  }
};
export default Button;

3. Use Class Component For Stateful Container Component
Class Components are stateful and contain lifecycle method such as componentDidMount, componentWillUnmount, componentWillReceiveProps, shouldComponentUpdate, component will update, componentDidUpdate etc. and custom method.
Since container component basically deals with state and does data fetching and then renders its corresponding sub-component, so for developing it, we should use class component.
import React, { Component } from 'react';
import { Text, View } from 'react-native';
import Button from '../components/Button';


class Counter extends Component {

  state = {
    count: 0
  };

  componentWillUpdate(){
   // Call API and Manipulate the response data if needed
  }

   const increaseOne = ()=>{
     this.setState({count: this.state.count + 1});
   };

  render() {
   return(
    <View style={containerStyle}>
      <Text style={textStyle}>Count: {this.state.count}</Text>
      <Button btnName=”Add” onClick={this.increaseOne}></Button>
    </View>
  );
};


const styles = {
  containerStyle: {
    flex: 1,
    justifyContent: 'center',
    alignItems: 'center',
    margin
  },
  textStyle: {
    textAlign: 'center',
    fontSize: 25,
    fontFamily: fonts.bold,
    color: colors.grayLight,
    margin
  }
};

export default Counter;
4. Key Of Each Element In List Should Be Unique
In React, unique keys help identify which items have changed, are added, or are removed. The best way to choose a key is to use a string that identifies a list item among its siblings uniquely. We recommend to use IDs from your list item as keys:
    const todoItems = todos.map((todo) =>
      <li key={todo._id}>
        {todo.text}
      </li>
    );

5. Manage Static Image Resources
React Native integrates the images and other media assets in such a way that can support in your iOS and Android apps. To add a static image in your app, you have to do in such a way that the image name in require has to be known statically.
Related read: Top 10 Laravel Best Practices You Should Follow
 // BAD
  var icon = this.props.active ? 'icon-innofied-active' : 'icon-innofied-inactive';
  <Image source={require('./' + icon + '.png')} />;

 // GOOD
  var icon = this.props.active
   ? require('./icon-innofied-active.png')
   : require('./icon-innofied-inactive.png');
  <Image source={icon} />;
6. Use Redux.js for managing States and Business Logic
React is just for UI. Now, the question is, “Where to put all my state and business logic?” glad that you asked! Redux comes here to maintain state and business logic inefficient way because redux architecture typically deals with large-scale apps development. Now let’s see how redux works –
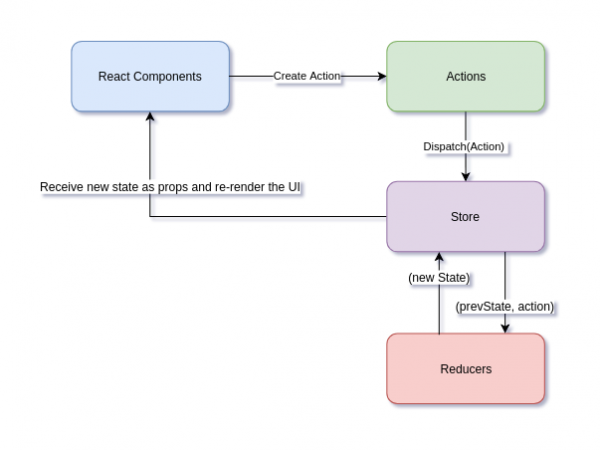
- When a UI event happens, in the component, callback functions as props get called
- Based on the event, the callbacks create and dispatch actions
- Reducers process the actions, computing the new state
- The new state of that app goes into a single store.
- The new state as props are received and re-render themselves where needed in Components.
7. Optimize React Native Images And Store It In Cloud Storage
Optimizing React Native images should be your higher priority, whatever your requirements are. So, resize the images locally and upload the images to cloud storage like s3 by server and get the cdn link and return them back using an API. In these process, you can load the images in faster way.
8. Feedback/highlighting And Cancel-ability Should Be There In Gesture Responder System
To make your users feel great using your app, every action should have the following attributes:
- Feedback/highlighting – let the user know what is handling their touch, and what will happen when they release the gesture
- Cancel-ability- when performing an action , let the user to abort it mid-touch by dragging their finger away
Related read: Top 10 Best Practices of Angular JS 1.X
These features make users feel more comfortable using an app, because it lets people experiment and interact without the fear of making mistakes.
9. Use Platform Specific Code And Styles
Though, React Native offers built-in API to write code that works on both the platforms, you will always end up writing platform specific things like stylesheets, and callbacks. To organize your code better, using the Platform module for stylesheets is the best way to manage the styles. For example, you can use the Platform.OS or the Platform.select APIs to automatically detect the platform and apply the right styles. Here I present to you a demo that shows you how Platform module could be configured.
import { Platform, StyleSheet } from 'react-native';
const styles = StyleSheet.create({
 container: {
   flex: 1,
   ...Platform.select({
     ios: {
       fontFamily: 'Arial',
     },
     android: {
       fontFamily: 'Roboto',
     },
   }),
 },
});
You can even add version-specific styles for Android and iOS. Just make your app feel natural.
10. Lock Dependencies, Prevent The Breaking Changes.
While adding more and more dependencies, make sure to lock the version. Please, beware of those breaking changes. Keep an eye on especially the JavaScript, because JavaScript library scene are going really fast.
"react-native-img-cache": "^1.5.3",
"react-native-fetch-blob": "^0.10.7",
"react-native-linear-gradient": "^2.3.0"
instead of this
"react-native-img-cache": "1.5.3",
"react-native-fetch-blob": "0.10.7",
"react-native-linear-gradient": "2.3.0"
use this
Delete ^ character from the library dependency in package.json.
Wrapping It Up
It’s been less than a year now and I am already loving React Native. The fact that it helps you build the most complex UI in a jiffy and works seamlessly for iOS and Android- React native is undoubtedly the new hope in 2019. If you are into JavaScript, you’ll find how intuitive the learning curve is- from ReactJS to React Native- an easier way to use our beloved React. And we have tried to present the top 10 react native best practices.
Also, with increasing React native community, the technology is definitely not getting old anytime soon- talking about the love for its usefulness and light weight. Forget Cordova- React Native is the new talk of the town.
We have been working with numerous startups and big businesses for more than 8 years, using React Native since it’s launch to create amazing apps. We are no stranger to the headache and pain one goes through in order to find the best company suitable to launch their project. Which is why, we take special care to make sure all your needs are met on time and provide unique solutions to each client. If you need any help with your app project, we have the solutions ready! Talk to us today.
 This post was originally published on Dec 6, 2018 and has been updated for accuracy and comprehensiveness